Evening dress (1816); from Ackermann's Repository.
The eighth stop on my Regency Journey is to make a ball gown. Balls and dancing were a frequent entertainment in Regency times, as was evening parties with friends. People would often dress elaborately for dinner, even if they were not going out or entertaining. For these reasons, evening wear was often elaborately decorated with embroidery, spangles (sequins), and lace. Women’s evening gowns in the Regency era were also often low cut around the bosom and had very short sleeves.
Jane Austen wrote to her sister, Cassandra, about a ball she attended in 1810.
Our ball was rather more amusing than I expected. Martha liked it very much, and I did not gape till the last quarter of an hour. It was past nine before we were sent for and not twelve when we returned. The room was tolerably full, and there were, perhaps, thirty couple of dancers. The melancholy part was, to see so many dozen young ladies standing by without partners, and each of them with two ugly naked shoulders.
Jane Austen (1810)

An Evening Dress (1818): Description of how it is made.
As I did not have a pattern for a ball gown (or any idea of where to start drafting one), I did have to do a fair bit of research into the way dresses were constructed and the types of embellishments they had. I derived my inspiration from several fashion plates, published in Ackermann’s Repository. Each issue of this journal had descriptions of some of the popular fashions that had been seen worn in France, with descriptions of how they had been made.
For instance, the white gown (1816; pictured above) was described as “a white crape frock over a satin slip; […] ornamented with French Lama work in silver; the dress is cut very low all around the bosom, and the crape fronts are open at each side so as to display the white satin one underneath. The sleeve is an intermixture of white satin and crape; the latter full, the former tastefully ornamented with silver, to correspond with the bottom of the dress.”

Dinner Dress (1818); from Ackermann's Repository
During the years 1815-1820, the fashions had begun to change from the simple, plain muslin dresses of 1800-1810. The sleeves and bodices of dresses became shorter and more elaborately decorated, and to balance this, the bottoms of dresses were also embellished. These embellishments, as well as side gores for the skirt, changed the silhouette of the skirt to be more triangular.
Jane Austen, much to be lamented, died in 1817, and her last two novels were published posthumously in 1818. As a tribute to her, my ball gown will be inspired by the fashions of these years.
I will try to do further justice to this remarkable author by endeavouring to prevent my “two ugly naked shoulders” being visible at the Jane Austen Festival Ball!
Making a Ball Gown
The Pattern
I had no pattern to work from this time, except ideas I had gathered from fashion plates and the things I learnt constructing my last two day dresses. Using these as a starting point, I drafted the pattern.
1. Using my body measurements, I drew out the pattern on 1/4 inch grid paper and cut it out. Seam allowances were added when the fabric was cut out. All measurements stated from here on DO NOT include seam allowances.
Important Measurements to take for this type of dress:
- Waist circumference (the waistline is high under the bust in this case)
- Arm circumference at the underarm and mid-upper arm (for the armband)
- Arm length from shoulder to mid-upper arm (for the short sleeve)
- Circumference of the arm at the shoulder (armhole measurement)
- Shoulder to waist measurement (for the height of the bodice)
- Waist (underbust) to floor measurement (for skirt length)
2. As the material was so expensive (and because I was unsure of my skill for designing such a garment from scratch!), I decided to make a mock-up or toile of the bodice out of some scrap cotton calico I had in my stash. This enabled me to make mistakes without fear of financial ruin! This mock-up was also done with the sleeves.

My bodice toile (front): This enabled me to experiment with the neckline, waistline and the shoulder straps in order to get the right "look".

My toile (back): I experimented with the back "arch" which was common this era, though I went a bit too far on the toile!
3. The pattern for the skirt front and back were merely two large rectangles. The front skirt was cut on the fold, measuring 10″ x 48″, and the back skirt was cut on two layers of fabric, measuring 36″ x 51″. Triangular side gores (right-angled triangle), which point backwards, were common in this era and provided more fullness to the skirt. Mine were 48” long and 15″ wide at the bottom, narrowing to a point at the top. The waistband was 35″ long and 1/2″ wide. The armband was 15” long and 1″ wide. All other pattern pieces are shown on 1/4 inch grid paper in the photo below.

The pattern pieces: Front Bodice, Back Bodice, Back Shoulder Strap, and Sleeve. I later added a semi-oval of material to the front decolletage.
One change I would make to the pattern is to widen the front skirt to maybe 15 inches (instead of 10). The side seam of the skirt does not stretch around to the back as far as it did in period examples.
Construction Steps
1. Skirt: Sew the skirt together first, beginning with the centre back seam, leaving a 10 inch opening at the top. The long edge of the triangular side gores are then sewn to the back skirt panels and to remaining long edge to the front skirt panel.
2. Bodice: Sew bodice together at the side back seams, leaving the centre back seam open. The shoulder strap is then sewn to the back bodice and the front bodice. The bodice lining can be sewn together in the same way.

Sew the bodice side seam and shoulder seams
3. Bodice cont’: Make a strip of piping out of a contrasting colour, by folding a strip of material (1/2″ wide – plus seam allowances – and long enough to go around the neckline) in half lengthwise. The piping can be stuffed with cord, strips of material or wadding. I threaded a long strip of 1″ wide chiffon through it once it was attached to the bodice.
Sew the piping to the neckline of the bodice first. Then put the bodice and the bodice lining together, right sides facing, and sew them together on the same stitching line as the piping was sewn. When it is turned the right way, it should look like the picture below.

Ivory piping sewn to the neckline of the bodice
4. Attach bodice to waistband: The front bodice pieces of this era were cut out of one piece with no darts, which means it has almost no shaping around the bust. In order to fit it to the body, gather a small amount of the bodice underneath each bust. Adjust the gathers to fit and sew the waistband along the bottom edge of the bodice.

The underbust gathers are visible. The neckline easing is hidden under the lace.
In order to stop the front gaping at the top, I also had to run a gathering stitch along the front neckline. The gathering threads were not pulled tight enough to gather it properly, but just to draw in the neckline a little, and then I sewed over the top with a normal stay stitch. Instead of this, you could make a casing for a drawstring or ribbon around the neckline, which was a common way to help the bodice fit properly in this era.
5. Bodice Embellishment: Embroidery or sequins can now be added to the bodice.

Embroidery and beading detail
At this point, I also added a small curved piece of fabric, edged with piping, to the front decolletage, just like some of the pictures in Repository.
6. Sleeves: The sleeve seams are sewn and then a small section of the bottom edge is gathered. The armband is then attached (in the same way as binding) to the bottom edge of the sleeve. The sleeve head can then be gathered to fit the armhole. Various sleeve decorations can then be added. I pinched small sections of the sleeve together and sewed some pearl buttons to the bunched area. I also attached some matching lace around the armband. It was also common to have embroidered sleeves to match the bodice.

Sleeve detail
7. Attaching the skirt to the waistband: Pleat the centre back skirt in 12 pleats on each side, each pleat using about 2.5 inches of material. Adjust the pleats to fit the waistband and sew.

Back view of 12 pleats
The waistband can then be finished off in the following manner. The seam allowances of the bodice and the skirt can be trimmed and then folded towards the waistband. Then another piece of material (i.e. waistband lining) or a piece of bias binding can be hand sewn to the inside to hide any raw edges.
8. Skirt Embellishment: The bottom edge of the skirt can be hemmed and decorated to match the bodice and sleeves. I am planning to do some embroidery around the hem to match the bodice embroidery.

The skirt detail; two strips of stuffed roulade, with netting and lace, scalloped with pearls.
9. Finishing off! Eyelets are handsewn along the centre back and lacing is inserted. I had also put in a strip of boning along the centre back, just to keep the bodice flat when laced.

Back lacing detail

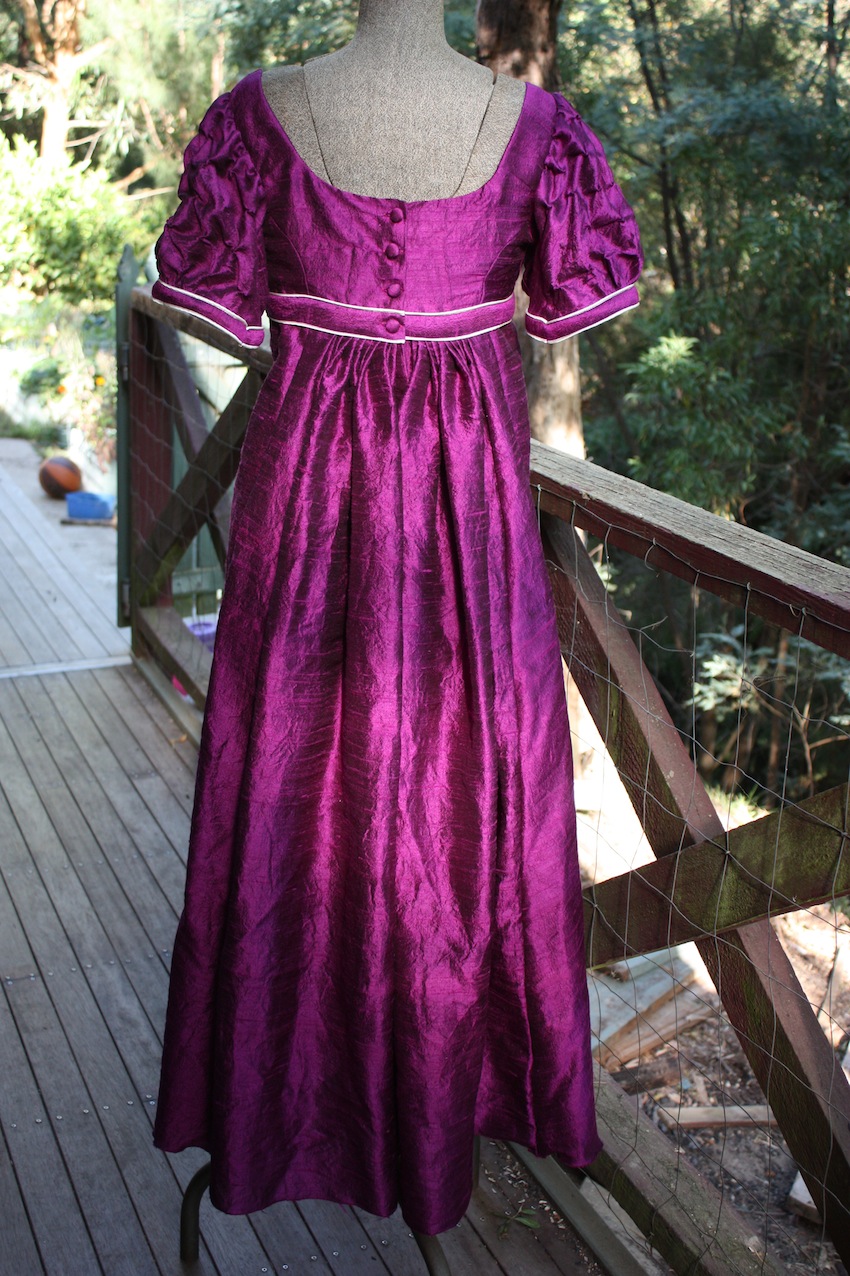
The back view

All finished!
The next destination on My Regency Journey is a reticule to match this charming ensemble. – coming soon!
To view these posts in order, go to My Regency Journey.
Related Posts
My Regency Journey: In the beginning…
My Regency Journey: Making a Dress for Daywear
My Regency Journey: Making an Embroidered Morning Negligee
Sources and Relevant Links
Making a Toile
Fashion Plates of the Regency – this site has reproduced a vast collection of fashion plates from the Regency period.
Ackermann’s The Repository of Arts, Literature, Commerce, Manufacturers, Fashions and Politics, Series 2, Vol. 6 (1818) – read online
It’s All in the Details: Making a Regency Ball Gown – design tips for historically accurate gowns
How to make Hand-worked Eyelets
Regency Embroidery Designs – this site has reproduced quite a collection of embroidery designs from the Regency period.
Jane Austen’s Letters – read online
Jane Austen Festival – website
Read Full Post »