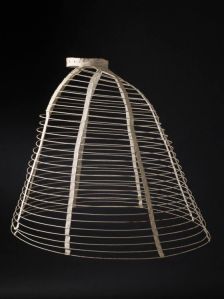
A cage crinoline, with metal and cane supports, held together with cotton tape, c. 1865, from LACMA.
One of the costumes that has been on my list for the past year has been a mid-19th century ball gown. I have an “Alice in Wonderland” Ball coming up, and – since Lewis Carroll published this novel in the year 1865 – it seemed a perfect event to make it for.
Throughout the 1840s and 1850s, the skirts had been gradually increasing in size with the use of multiple petticoats, often stiffened with horsehair or cording. When the crinoline was patented in 1856, it reduced the necessity for many layers of heavy petticoats, as the hoop did everything that petticoats could not! It also allowed the dress to increase in size much more easily, as all that was needed was a wider hoop.
By the mid-1860s the hoop began to change shape from the conical fashion of the 1850s to an elliptical shape, where the skirts began to stand out more at the back of the dress. Towards the end of the 1860s the skirts began to be draped to the back to accentuate the rump, in preparation for the first bustle period that came in the early 1870s.
Not all the powers of ridicule, nor the remonstrances of affection have been able to beat down that inflated absurdity, called Crinoline! It is a living institution, which nothing seemingly can crush or compress.
“The Despotism of Dress” (1862),
quoted in Corsets and Crinolines, by Norah Waugh
Whether the rebukes were in the name of “ridicule” or “affection”, I can see why women kept wearing crinolines! They are so much fun!
Pattern
I used a pattern from Truly Victorian, which was their 1865 Elliptical Cage Crinoline (TV 103). There was also a useful pattern in Jean Hunnisett’s book, Period Costumes for Stage and Screen, that provided extra information.
I really wanted to make a red crinoline, but in the end (in the name of saving costs) I dug into my stash and found some pink supplies that I could use. I used pink poly-cotton material, with polyester bias binding for the horizontal channels and pink polyester twill tape for the vertical supports and the waistband. I used white flat steel for the boning.
Construction
I have not detailed all the construction steps here, as the Truly Victorian pattern has great instructions. Instead I have given a brief overview.
Step 1: Sewing the bag together.

The bag is sewn up, ready to be folded lengthwise in half.
Step 2: The bag folded in half, with four horizontal boning channels sewn.

The boning channels are sewn in the bag, leaving a gap for the boning to be inserted.
Step 3: The half moon piece is sewn and then quilted.

The half moon shape is sewn and machine quilted for strength.
Then the vertical supports are attached with the waistband.

The vertical supports have been sewn to the crescent and the waistband attached as well.
Step 4: The two centre front vertical supports are sewn to the waistband so that they can slide along it.

The vertical supports at the front are attached to the waistband with a loop so it can move along.
The vertical supports should all be marked as to where the horizontal boning channels will intersect. Once all the vertical supports are attached to the waist and attached at the bag, then the boning can be cut and inserted into the channels. Once again, the boning channels need to be marked as to where they will intersect with the vertical supports. The TV pattern instructions go into great step-by-step detail as to measurements for this part.
Step 5: Inserting the boning and attaching the boning channels.

The boning channels are being attached with pins at the moment.
Step 6: In order to support the back of the bustle, I stuffed a crescent pillow with wadding and sat it underneath the quilted half moon piece on the crinoline. This was suggested in Jean Hunnisett’s pattern and it made a huge difference in the stability of the hoop.

This crescent shaped pillow is stuffed HARD with wadding and then sewn to the waistband very sturdily.
Step 7: Try it on, and – once you are happy with how it sits – the boning channels can be handsewn to the vertical supports.
I am really pleased with how it turned out!

All finished! The hoop is not as balanced on my dummy as it is on me, which reinforces the need for a fitting before the final fixing of the horizontal and vertical supports.
My next post will involve making the petticoat. – coming soon!
Related Posts
Sources and Relevant Links
Image Source: A cage crinoline, c. 1865, from Los Angeles County Museum of Art (LACMA)
Corsets and Crinolines, by Norah Waugh – buy on Amazon
TV 103 – 1865 Elliptical Cage Crinoline, by Truly Victorian Sewing Patterns
Period Costumes for Stage and Screen: Patterns for Women’s Dress, 1800-1909, by Jean Hunnisett – buy on Amazon


Leave a comment