
Evening gown, made from silk and linen, embroidered with metal and glass beads, c. 1913-1914, from the National Museum of Norway.
Talk about Titanic Panic! Work had to begin on the gown!
Gowns had begun to change in a new and different way during 1908. Waistlines suddenly rose. Skirts suddenly clung to the legs. And an entirely different set of undergarments were needed to achieve this hip-hugging new look.
Evening gowns during the early 1910s were all generally “built” on a bodice, which could often be completely hidden beneath all of the outer draped layers. This bodice was often boned and could reach from above the bustline to below the natural waist.
On top of this bodice was mounted all of the other layers. The skirts, often several layers in contrasting colours and different lengths, was sewn or tacked to the bodice. The first layer of skirt was most often a soft, flowing silk satin, and was then followed by a lighter and more sheer layer, such as silk chiffon or netting. Sometimes there were several of these sheer layers, of two or more colours, to add depth or interest, and these layers were often beaded, sometimes very heavily. Evening gowns could be trained with either a square, pointed or rounded shape.

Evening gown, made from blue silk satin and chiffon, c. 1912, from Augusta Auctions.
The sleeves of this era were cut in the same style as a Japanese kimono sleeve, which gave a very draped and flowing appearance. These soft sleeves were often mounted on top of a fitted sleeve made from chiffon or net, which provided the structure to the outer sleeve to prevent them falling down. They generally reached to just above the elbow, but could be shorter. Sometimes these kimono-style sleeves even formed a part of the bodice, as the sleeve did not attach to the armhole, but rather the sleeve and the shoulder were one piece. This line of drapery was then just extended down to the waistband at the front and the back.
Once the sleeve-shoulder-bodice pieces were themselves tacked onto the under bodice, a wide waistband was used to cover it all. This waistband clearly marked the higher waistline of this period, and a sash could often be hanging from the waistband at the back.
Pattern
I used the pattern of an evening gown from 1909-10 (made by Madame Hayward), in Janet Arnold’s Patterns of Fashion 2. There was some alterations I was keen to make, but it provided a good starting point.

An evening gown in ivory silk satin and black net, c. 1909-1910, from Patterns of Fashion 2.
This gown uses a small kimono sleeve, which has a larger bodice mounted on an under bodice which cannot be seen. I decided to use the underbodice from this pattern, making it a bit higher at the front, and then extend the sleeves so they came down to the waistband, and thereby do away with the outer bodice you can see in the picture. The skirts I intended to make were basically the same as this pattern.
The construction of this dress seemed very complicated when reading it all through, so I did skip some minor things that didn’t seem necessary to me. However, due to its complicated nature, the length of this post is much longer than normal.
I used a polyester taffeta for the dress (I was pleased to find one dress in this era made from taffeta!), flatlined with cotton broadcloth and overlaid with a silk chiffon. The undersleeves were made from soft polyester tulle.
Construction Steps
Step One: The bodice
First I drafted the pattern out, did a mock up and fitted it with my corset on. The calico mock up pieces became my new pattern.

The pattern for the bodice, showing the original pattern below and my adjusted calico pattern above.
I flatlined each panel with white cotton broadcloth and sewed all the panels together. The raw edges were neatened as one.

The bodice panels are all sewn together.
Then I attached boning channels to the seams. I used some twill tape and sewed each side of the tape to the seam allowances, so the channel sits in the centre of the seam but is not seen from the outside. I used solid nylon (plastic) boning.

The bodice seams are all boned.
As per Janet Arnold’s instructions, the top of the bones stand free.

The boning channel stands free at the top. You can see that I have hand stitched the top of the casing to hold the bones.
Note: It was clear to me when I fitted the bodice with the boning attached, that the original gown was probably meant to go over a mid-bust corset, rather than an underbust, as there is little bust shaping in the bodice. As I had made an underbust corset, the boning in the bodice did not behave as it normally would have. I ended up increasing the length of the boning strips in three of the seams; the centre front and the two side-front seams. This helped the front of the bodice to conform to my shape better.
A thin flat metal bone was put in the centre back edges. Then I attached hooks and eyes on the centre back seam, which met edge to edge. (Later on I did sew a little flap on the inside so that any gaping on the centre back seam was less noticeable.)

The hooks are attached to the gown beneath a facing. There is also a facing on the “eye” side, which are both slipstitched down.
Step Two: The net undersleeves

The pattern for the net undersleeves, cut in polyester tulle.
The undersleeves were sewn together. The pattern indicates that a line of elastic is sewn along the neckline edge to help the sleeve stay on the shoulder.

The undersleeve sewn, with the elastic sewn on the lefthand edge.
The undersleeve was sewn to the top edge of the bodice. A fitting at the point is good to establish that your sleeves are in the right spot for your body.

The undersleeve is attached right-sides-together to the bodice. There is a bit of extra netting fabric in the allowance to trim away.
To finish the top edge of the bodice, I sewed a strip of insertion lace which could be drawn up with a ribbon.

A length of lace is sewn around the top of the bodice to neaten the edge. The eyes can be seen on the left of picture. You can also see the lengthened boning on the right of the picture.
The bottom edge of the bodice was hemmed with a length of bias binding, sewn right-sides-together, turned to the inside and handsewn down to cover the raw edge.
A grosgrain ribbon (to act as a petersham waistband) was stitched at the natural waistline on the inside of the bodice. It was attached at the centre front boning channel and the two side-front boning channels with herringbone stitch. This waistband is fastened with a hook and eye.

The petersham waistband sewn in. You can see the lace inserts tacked in at the neckline too (Step Six).
The bodice was now finished.

The front of bodice

The back of bodice, showing the ribbon that ties up and keeps the top edge of the bodice tight.
Step Three: The skirt layers
I cut out the underskirt and sewed the side seams and back seam, leaving a bit open for a placket. There is also a small piece added along the placket edge to hide any gaps in the skirt.
It was important to re-fit at this stage, as the skirts are designed to fit fairly snugly over the hips but should still be roomy enough to sit down in.

The underskirt (with train) is cut out. You can see the placket “flap” already attached on the left.
I cut out the chiffon overskirt and sewed the seams together. (I always zigzag all raw edges of chiffon before I start sewing it too!) An opening is again left in the centre back for the placket.
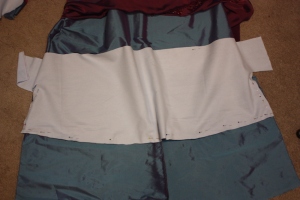
The top edges of both skirt layers were neatened with a zigzag, and the top edge of the chiffon skirt was gathered to help with the easing of the skirt around the bodice. The skirts were then pinned in place, flat against the bodice, and handsewn through all layers with a running backstitch.

The skirts are attached to the bodice with a back stitch. (The lace at the bottom was eventually used at the neckline.)
At the back placket, the chiffon was hand stitched to the underskirt. Hooks and “thread loop” eyes were added to the back placket to close the skirt opening.

The back skirt placket, shown here half done up.
Step Four: The chiffon oversleeves
I cut out the chiffon oversleeves, first draping them to get an idea of how long and wide they should be. They are cut in the same style and shape as a kimono style sleeve.

The chiffon sleeves cut out, with the neck edge against the selvedge. The under-arm shape is yet to be cut out.
Once I had neatened the raw edges of the chiffon, I draped it on the stand to work out the under-arm shape. I made sure to test out the range of movement of the arm as well, as this can be adjusted by how the sleeve is pinned at the waistline.

The under arm section is pinned, ready to sew and then trim back.
The underarm seam goes down the underside of the arm, and then down the side of the body. The resulting side seam should mean that the bottom edge of the sleeve can be sewn to the bodice around the waist area. I sewed this edge down (already neatened) with the same running backstitch through all thicknesses as before with the skirts. This untidy looking midriff area will be covered with the sash in following steps.
I sewed overlapping sequins along the neckline of the gown. This had the double effect of attaching the chiffon sleeves to the net sleeves underneath, whilst also attaching the chiffon sleeves to the front and back of the bodice. I sewed a similar row of sequins along the arm edge of the sleeve, turning under the zigzagged edge to neaten it.

The sequins are handsewn around the neck edge of the sleeves (shown only on the right here).
Step Five: The waistband and sash
I cut the sash and waistband out as per the pattern given by Janet Arnold, only adding a bit of extra length in case I should need it. The waistband was a straight piece of fabric, 3 inches wide, which had to be pleated to fit the tapered angle of the high waist. Once pleated to my satisfaction (which took a long time!), and with the raw edges turned under, I hand stitched the waistband in place on the bodice using a slip stitch, making sure to go through all layers to properly anchor it. I also stitched the waistband pleats in place with small slipstitches, as the taffeta did not want to stay in its pressed position.

The waistband, side back view, showing the pleating to help shape it.
I cut two layers of each sash, sewing them right-sides-together and turning them the right way to get two sashes. I did an inverted box pleat in the top of each sash, making sure that the resulting size fitted the waistband area.

The two sashes, with a box pleat at the top.
The bigger sash was attached underneath the waistband (on the left side) with hand stitches, making sure to go through all layers to properly anchor it.

The larger sash is attached on the left side, underneath the waistband.
The smaller sash was attached to the left side of the waistband on an angle, which required some adjustment and pinning in place so that it hung down straight. It was hand sewn onto the waistband securely.

The smaller sash is attached on an angle on the right side of the waistband. It hangs down over the larger sash.
Hooks and eyes were added to do up the overlapping waistband.
Step Six: Decorating and embellishing
A beaded fringe was attached to the bottom edge of the chiffon skirts, with the zigzagged edge turned up to neaten it. Another row of overlapping sequins was sewn over the top of these stitches.

The beaded fringe is sewn on by machine, turning up the zigzagged edge.
Beading and sequins were then sewn in a graduating way up the chiffon skirt.

The beaded fringe, the sequins and beading, all completed.
Lace sections were sewn to the front and back neckline to conveniently cover some of the undergarments that kept peeking through. The raw edges of these lace sections were bound with cotton tape and then tacked in place.

Lace was cut to fit in the front and back neckline. The one pictured is for the front.
The back lace section was cut in half at the centre back and then had a hook and eye attached so it could be done up.
Step Seven: The hem and train
The hem was faced with a piece of cotton flannette (wool flannel in the original example), which reached up 12 inches from the front hem. This hem facing was sewn, right-sides-together, around the bottom raw edges of the skirt and up the side slit.
The front hem facing is pinned and cut to shape to match the skirt.

The back hem is cut to form a pointed train and the hem facing is pinned ready to sew.
The facing was then handsewn down from the inside. Any stitches that were showing are covered by the chiffon overskirt.
A lead weight was sewn into the facing to help weight the train down, and a hook and eye was attached so that the train could be folded up if needed.

The lead weight sewn into a little square of flannelette, with the hook shown.
I found this gown was quite complicated to make, but I was very pleased with my efforts when it was finished. There were many low points, like cutting a hole in it and struggling with fitting issues.

The front view

The back view
Finally, it is all completed and now its time for some real Titanic panic!

I thoroughly enjoyed my evening out!
I hope you have enjoyed my Titanic-costuming-adventure as much as I did. Now its time for a cup of tea and a lie down!
Related Posts
Titanic Panic! – Making a chemise/drawer combination suit
Titanic Panic! – Making a 1911 corset
Sources and Relevant Links
Image Source: An evening gown, c. 1913-14, from the National Museum of Norway (Nasjonalmuseet).
Image Source: An evening gown, c. 1912, from Augusta Auctions
Patterns of Fashion 2: Englishwomen’s dresses and their construction, by Janet Arnold – buy on Amazon
Evening gown (c. 1909-1910) made by Madame Hayward, from Museum of London.
How to do a running backstitch, by Felt Magnet
How to make thread loops, by Historical Sewing
Dressing for Dinner on the Titanic: Early 1910s Evening Dress, by Demode Couture
Free pattern from an extant evening gown at Chapman Historical Museum, made from silk and chiffon, c. 1911-1913, patterned by Cassidy Percolo.
“Titanic” Theatre Restaurant – Williamstown, Melbourne, Aus.


Wow! That does sound quite complicated! You did a beautiful job!
Yes, it was jolly complicated!! These late-style Edwardian gowns look so effortlessly draped, but they are quite elaborate underneath it all.
Beautiful- I love the colour combination.
Yes, I do too. Blue and purple are my favourite colours!
Great job. A lot of time and effort well invested.
Thank you!