In this series of posts, I have been making the elements of a midshipman uniform employed in the British Navy during the years 1795 to 1812. In this post, I have been working on a cutaway tailcoat that was worn by midshipman during this period.
The midshipman tailcoat transitioned from before the 1790’s, when the front buttoned edge formed a large curve from the collar-bone, in to the sternum (where it would be fastened with often only two buttons), and then falling out past the waist and around to the back of the knees.
In contrast to this, the cutaway coat had a straight button-up front, where all of the buttons were functional, but at the belly there was a horizontal edge out to the pelvic bone, then beginning a curve down to behind the knees.

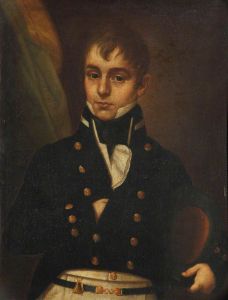
A Portrait of a Midshipman – 1810 (c) National Maritime Museum; Supplied by The Public Catalogue Foundation. Note that the double-breasted nature of the coat is incorrect.
The coat of a midshipman also had a high stand-up collar, with the white patch (with a button) of a midshipman rank. There were three decorative buttons on the cuffs, three decorative buttons underneath the corners of the flap pocket, a button to hold each of the two back pleats, and functional buttons down the centre front.
The above painting of Midshipman Deans (1807) is the clearest picture of the coat that I can find, as midshipmen portraits often only included the face and torso.
Hornblower had Pellew’s order as acting-lieutenant for two months now. Tomorrow he would take his examination. If he should pass the admiral would confirm the order the next day, and Hornblower would be a lieutenant with two months’ seniority already. But if he should fail! That would mean he had been found unfit for lieutenant’s rank. He would revert to midshipman, the two months’ seniority would be lost, and it would be six months at least before he could try again. Eight months’ seniority was a matter of enormous importance. It would affect all his subsequent career.
Mr. Midshipman Hornblower, by C.S. Forester

I used the 1790’s coat pattern in Norah Waugh’s “Cut of Men’s Clothes” as one of my references, particularly regarding pocket placement, sleeve shape, and the back pleating.
Pattern
In deciding what sort of pattern to use, I spent a bit of time researching coats from the 1790-1800 time frame. I looked particularly at the construction details in the 3-pointed-flap-pockets and the arrangement of the pleats. I found examples in the books Costume Close-up, by Linda Baumargarten and The Cut of Men’s Clothes, by Norah Waugh, and I also looked at as many paintings of midshipmen as I could find. (The downside with the paintings was that they rarely showed a full shot of the coat.)
Once I had determined where I wanted the seams and how high around the neck to have the collar, I laid the lining on my son’s body and “draped”, cutting a large allowance for seams (in case of mistakes!). Once the lining was pinned and adjusted to fit, I used these pieces to cut out the outer material.
This coat was made from navy woollen fabric (I think it was a wool/poly blend, actually). It was lined with ivory cotton broadcloth, and the buttons were a metal gold colour with a fouled anchor imprint on them.
Construction
For more step-by-step detail on making a tailcoat, you can refer to my similar post, MY Mr Knightley: Making a Regency Tailcoat. Several elements of this midshipman’s coat were done differently to my previous tailcoat, in particular the collar, the back pleats, and the pockets. Unfortunately my progress pictures were lost when I misplaced my camera’s SD card, so I am not able to include as much detail as I had planned to. Hopefully when I find them I can add them later!
Step One: The centre back seam, side seams and shoulder seams were sewn, for both the outer material and the lining.
Step Two: The sleeves were sewn together and attached to the coat. The sleeve lining was handsewn in to cover the raw edges of the sleeve seam, which had been pressed towards the sleeve.
Step Three: The pockets were made similar to a welt pocket (except without the outer welt). I made a slash through the outer fabric (not the lining) and then sewed one pocket-sized piece of broadcloth to the upper edge of the slash and one to the lower edge. These were turned to the inside, where the sides and bottom edges of the pocket pieces were sewn together. A three-cornered flap was then sewn to cover the slash, with three buttons decorating it.
Step Four: Around the tails of the coat and up to the cutaway area at the centre front, the raw edges of the lining and outer fabric were turned to the inside and handsewn with a topstitch. This was also done with the raw edges of the seams to be pleated in the tails. Once the raw edges of these seams had been sewn in, I made the pleats, pressed them, and hand sewed the seams together with a whipstitch. This seemed to help them sit flatter, but the wool does need a good deal of pressing to get it to pleat properly! Buttons were sewn at the top of the pleats to help hold them in place.
Step Five: The collar was lined with ivory cotton broadcloth and sewn to the neckline of the coat. I used a very similar pattern as I used for the collar of the waistcoat.
The midshipman patches were made using some white cotton broadcloth. Two layers were sewn together and then turned right-side-out. Buttonhole stitching was done across the centre of the patch and a small button sewn to the end of the patch. Then it was handsewn in place on the collar.
Step Six: The raw edges were turned in at the centre front and then handsewn with a topstitch through all thicknesses. The buttonholes were handsewn and buttons attached.
Step Six: The cuffs were made with only one layer of wool, just to make it a bit thinner. They were attached to the end of the sleeve and then turned up. Three gold-coloured metal buttons were sewn through all thicknesses to keep the cuff in place. Apparently as young lads’ arms grew longer, these buttons could be removed and the cuff pulled down to lengthen the sleeve, and then the buttons were reapplied.
I am very happy with the way the coat turned out. It does seem to attract a bit of dust and fluff, and could have done with a little brush before the photos!
It also probably should have been made a little bigger, as I think this little midshipman will grow out of it quite quickly. The other thing to note is that the collar on the waistcoat should have come up closer to the base of the neck, as it doesn’t quite sit properly with the coat collar.
For my next post in this series, I plan to make a midshipman’s full dress bicorn! But first, a sailor’s tarred hat.
For more details on my costuming posts, visit my page Costumes.
Related Posts
The Making of a Midshipman – the introduction
MY Mr Knightly: Making a Regency Tailcoat
Sources and Relevant Links
Image Source: Midshipman Robert Deans (1807) – at Royal Museums Greenwich
Image Source: A Portrait of a Midshipman (1810) – at BBC: Your Paintings (Painting details online at Royal Museums Greenwich – where it states that the double-breasted jacket is incorrect.)
Costume Close-up: Clothing Construction and Pattern 1750-1790, by Linda Baumgarten – buy on Amazon
The Cut of Men’s Clothes, by Norah Waugh – buy on Amazon
Sewing a Welt Pocket – by Craftsy
Buttons of the UK’s Royal navy – by Diana’s Buttons


What an incredible achievement! Congratulations. It is good to know that you have at least two more budding midshipmen coming up through the ranks who will fit the coat once this one grows too big.
Haha! Yes, that is right!
Wow, I’m absolutely loving how the coat came out! 🙂
Thank you! I feel like it was a huge achievement!!
It absolutely is. 🙂