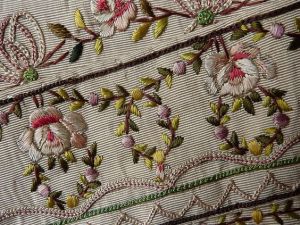
An embroidered coat, c. 1770-1780, from Manchester Art Gallery.
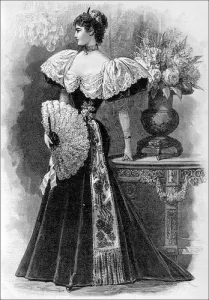
In the 18th century, menswear was generally quite elaborate. Not only was it colourful (including pinks and purples) with suits of clothes often matching, but court clothes could also be extensively embroidered.
The coat of the late 18th century began to be cut further away from the centre front below the waist, revealing more of the breeches and waistcoat than it had before. This meant that the coat could not be buttoned up, and often had only one or two functional buttonholes at the chest level, or sometimes a few hooks-and-eyes to fasten it closed at the top.
The skirts were not as full or as wide as they had been previously in the 17th and early 18th centuries, but there was still a significant amount of fabric pleated at the back in the skirts of the coat. These “skirts” reached to behind the knees.
Court suits, including the coats, were made from silk and were elaborately embroidered. Silk coats were generally lined, whereas their woollen counterparts could often be unlined.
Collars, particularly small standing collars, were becoming more common as the 18th century progressed, and it offered a prominent place to put embroidery for those coats designed for court use.
Fabric was very expensive during this era, more expensive than the labour to make the clothes, and so fabric would often be pieced together when the panels were not going to be big enough to fit the body. This is frequently seen in the skirts of the coats of this period. With embroidered coats, the join could also be performed for the purposes of conserving the look of the embroidery.
After I had finished (mostly) embroidering the jacket onto lengths of fabric, I was ready to turn it into an 18th century coat.

The finished panel, showing the two fronts at the top, the pocket flaps on the right, the buttons (unfinished here), and the cuffs at the bottom.
Pattern
I used the pattern from the book, Costume Close-Up, by Linda Baumgarten, as a guide. I did a mock-up and fitted it to check and see what alterations to the pattern were needed. Extra width around the middle, extra length to the skirts, and extra over the shoulder area were the major changes I made to the pattern.
Construction
Step 1: I began by cutting out the pieces of the body of the coat. These were: Front panels, back panels, pocket flaps. (I saved the sleeves, cuffs and collar for later!)

The front panels have been cut, along with a strip to serve as interfacing. You can see the join in the fabric on the right.
Step 2: The back pieces were sewn together, for both the lining and the outer.

The back panels are sewn together at the centre back seam. The vent is left open.
Step 3: The front pieces were sewn to their lining pieces at the centre front. At this stage, I have also sewn the lining fronts to the lining backs along the side seams.

The front panels have been sewn to the lining pieces (with a strip of cloth for interfacing). In this photo you can also see the pocket flap being put in place.
Step 4: The pocket flap was sewn, pinning the embroidered panel right sides with a lining piece.

The pocket flap sewn, but not turned the right way yet.
Step 5: A slash was made for the pocket bags. I make a slash that has a sideways V at each end, and looks like this: >—-<
Then I folded over the raw edges and whipstitched it to the pocket bags, which also had their raw edges folded outwards.

The finished pocket with flap raised and bag attached to the slash.

The pocket flap, finished.
Here is the coat so far, with the centre back outer panel still not sewn in.

The coat so far, laying spread out – inside down – with the outside showing.
Step 6: The back outer panel was then sewn to the front outer panels. To be honest, this could have been done earlier (more in the manner of making a normal coat with lining!) but I had really wanted to sort out the front panel with the embroidery first. In some ways it would have been easier to leave the back lining off and then slipstitch it in place, rather than leaving the back outer off and then fiddle around figuring out how to sew it on. I think I did it this way because the lining was a bit sturdier than the outer fabric and easier to do fittings with. The shoulder seams of the outer layer were then sewn.
Step 7: The sleeves were cut in two pieces, as sleeves were in this period, and sewn together. The sleeve lining was inserted into the sleeve outer and then sewn to the coat as one layer.

The two-piece sleeve outer, with the lining inside.
Step 8: The cuff panels were cut out. Firstly I sewed the cuff to its lining along the embroidered edge.

The cuff has been sewn to the lining along the embroidered edge.
Then it was opened out and sewn along the side seam. This meant that the raw edges on the side seams of the cuff would be contained.

The cuff and lining have been opened out, folded over and sewn along the side seam.
Then the seams were pressed open, the lining was folded over to properly back the embroidered panel, and it was ironed again. Then the cuff was sewn to the bottom of the sleeve.

The cuff is pinned ready to sew. The RIGHT side (embroidered side) of the cuff is pinned to the WRONG side of the sleeve. This means that when the cuff is folded to the right side, the raw edges of the seam will be not be rubbing on the wrist.
Step 9: The collar was cut out. I did not embroider this part initially, as I was not confident of it fitting correctly! I had planned to do the embroidery once it was fitted, however I ran out of time. My consolation was that another collar can be attached later!

The collar is cut out, from top to bottom: the pattern piece, the outer, the interfacing, the lining.
Step 10: A horizontal slash was made at the back for the back pleat, and it was pleated and sewn. Then the raw edges of the back panels were folded in and slipstitched together. The same was done with the front panels. Once all the raw edges were dealt with, the skirts were pleated, ironed and held in place with tacking stitches and buttons, as is outlined in Costume Close-Up.

The back view, finished. You can see the horizontal slashes and pleats at the centre back.
Step 11: The buttons were embroidered and covered and sewn on. I used some plastic pirate money for the button base! I ran out of time to do the centre front buttons, but all the others were done.

The finished buttons
Once the coat was finished and tried on, I discovered something was wrong with the fit around the shoulders, neck and arms. This necessitated it being unpicked and reworked, which was very annoying!! This meant that the centre front no longer meets as I had wanted it to. The importance of fitting is restated again!

The front view, shown on a female dress form (which alters how it looks a bit).
However, there are many portraits of men wearing their coats open that look the same as this one, so I am slightly mollified!

The side view

The cuffs, all finished.
This was an extremely challenging project. If I were to repeat the process, I think I would have made a plain 18th century coat first. Then I could have dealt with all the pattern alterations on something that could be easily altered, and then had a good pattern to work with when starting the embroidery.
The embroidery of this coat took 2 months, sewing almost everyday for up to 5 hours. The bits that were not completed were the collar, the front buttons, and embroidery at the back vent. As this was for an event (so I had a firm deadline), I just had to do as much as I could manage.
I am really happy with how it turned out, but I would love to finish off the rest of the embroidery at some stage. Stay tuned for my next post on making the waistcoat – coming soon!
Related Posts
Making an Embroidered Suit: Embroidery
MY Mr Knightley: Making a Regency Tailcoat
Sources and Relevant Links
Image Source, An embroidered coat, c. 1770-1780, from Manchester Art Gallery
Costume Close-Up, by Linda Baumgarten – buy on Amazon