One of the workshops I took at the Jane Austen Festival in April was on making a Regency day cap. Generally speaking, I don’t really like the look of historical caps but I thought that being married and having attained a much more “mature” age I probably should consider wearing one occasionally with my costumes. The other benefit of them is that it stops your hair getting stuck in straw bonnets!
At the workshop, we were provided with all the materials and instructions to make this cap but only really had time to learn the stitches and begin the first few edges of hemming. So this was one of the first projects I took out to finish once I arrived home.
Stitches Used
Rolled Hem
A rolled hem is a common stitch used in historical sewing, particularly for hemming the edges of ruffles and fine linens. There are many tutorials online for handsewing a rolled hem, so I will not repeat one here except to include a helpful photo.

Doing a rolled hem; on Hub Pages (link below)
Whipped Gather
This is a useful stitch for both neatening and gathering an edge of fabric at the same time. Here is a useful tutorial:
Whipstitch
This is a great stitch for seams and is often used in historical stitching. Once again, there are many tutorials online for this, but I have just included a photo for demonstration.

Stitching a whipstitch; from Holiday Crafts and Creations (link below)

Patterns for caps; from The Workwoman’s Guide (1840). Whilst these are Victorian caps, Figure 13 is the most similar to mine, using a horseshoe shaped capote.
Pattern and Construction Tips
The pattern I have used for my cap was supplied at the workshop, but there are patterns for many sorts of historical day caps online (such as the pattern from Kanniks Korner) or you could make up your own pattern.
There are basically four pieces to my cap:
- the capote (the head piece) – mine is an “arch” or “horseshoe” shaped piece and needs to be large enough to fit your head when gathered up,
- the head band – which needs to fit from ear to ear over the top of your head,
- the frill – which (as a good gathering guide) needs to be at least 2.5 times the length of the head band,
- the ties – cut two for tying under the chin.
My cap also had a small casing at the centre back (at the nape of the neck) to accommodate a cotton-tape tie. This made it adjustable around the back of the neck.
All the raw edges of each piece of my cap were neatened first, either by using the whipped gather (for any gathered edges) or the rolled hem (for all other edges). Then the pieces were sewn together with a whipstitch. This method is a good one because it means that there are no fraying edges on the inside.
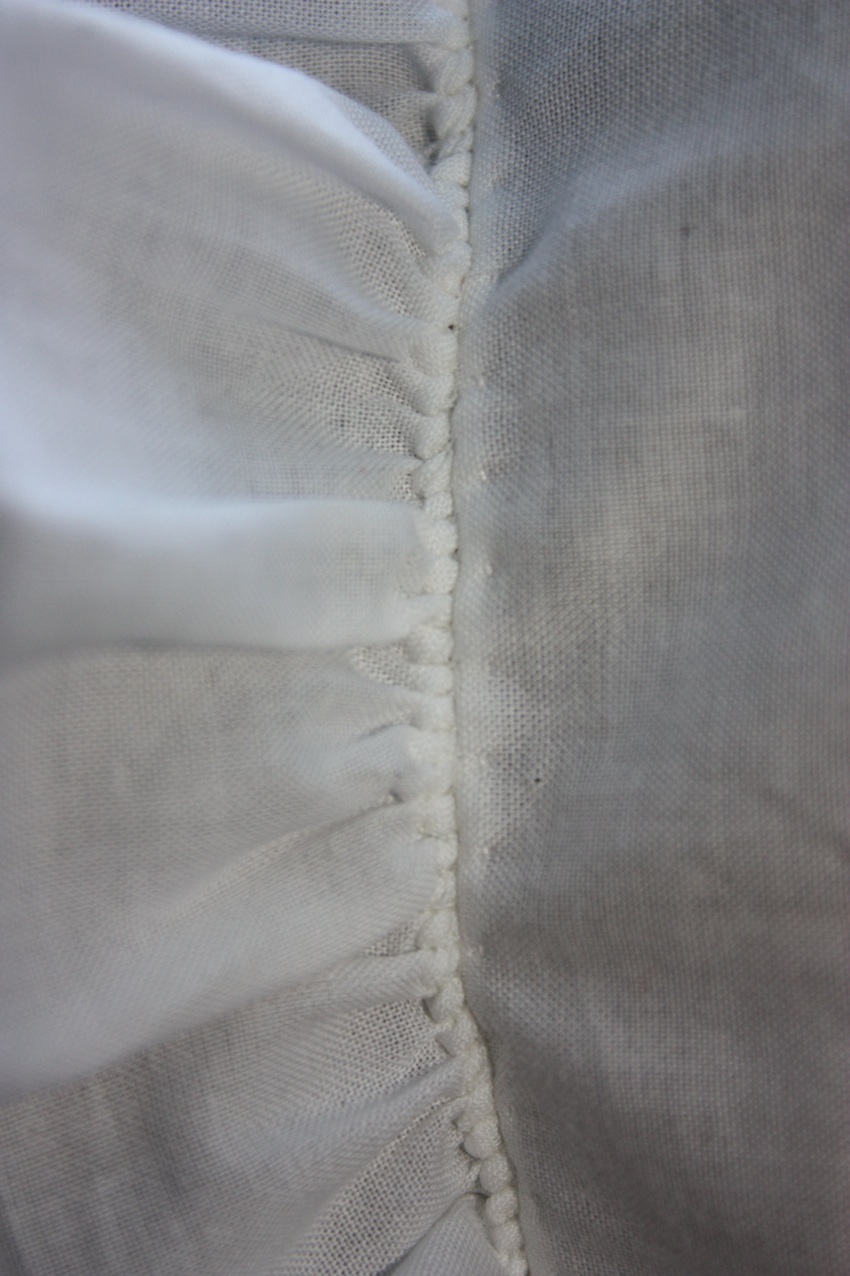
A close up of the stitches attaching the frill to the band. This is the right side and you can see how the gathering looks when finished.

Front view of cap: my daughter is modelling it for me.

Back view of cap
I really enjoyed handstitching this cap, and I think it looks really cute! (My husband wasn’t as enthusiastic and I think the kids just said it looked good to be encouraging…) I found it so therapeutic to sit and handsew in the evenings that I am now busy trying to decide what else I could make fully handstitched.
Related Posts
Sources and Relevant Links
How to sew a rolled hem – tutorial on Hub Pages
How to sew a rolled whipped gather – Youtube tutorial
How to sew a whipstitch – tutorial on Holiday Crafts and Creations
“Madame Novice” using the pattern from Kanniks Korner: Women’s and Girl’s Caps (1740-1820)
Kanniks Korner: Pattern for Women’s and Girl’s Caps – scroll down a little to find the relevant pattern.
The Workwoman’s Guide (1840) – read online
Jane Austen Festival Australia – website


