During the early Regency period, silk bobbin net and silk gauze dresses became increasingly fashionable.

White netted gown over a pale pink petticoat, Costume Parisien (1813), in Journal des Dames et des Modes.
Machine-made net, commonly called ‘English net’ or bobbinet, became more widely available in the early nineteenth century after the invention of a machine (patented in 1808, by John Heathcoat) which copied the technique of the much more costly hand-made bobbin net. This meant that net was cheaper and more accessible to more people.
From 1810 onwards, dresses overlaid in net or gauze increased in popularity. Some netted dresses were made to be worn over an alternate coloured dress or petticoat. Other netted gowns had the netting sewn into the matching or contrasting fabric so that the netting overlaid the dress permanently. Examples of both sorts of dresses can be seen in various museums, and I have included several links to online sources below.
Whilst machine-made net was cheaper, it was initially made plain and had to be embroidered by hand, that is, until a machine could be made to ornament it. Netting could be embroidered with tambour or other decorative embroidery stitches, often in the shapes of small flowers or spots. It also became popular during this time to embellish the hems of the net with embroidery, net frills, ribbon, roulade, satin, ribbon, lace or fabric flowers.

“Robe de Gaze. Garnie en Satin decoupe.” [Gauze Dress lined in etched satin] Costume Parisien (1813), in Journal des Dames et des Modes.
The skirts of gowns in this era were columnar, cut in large rectangles which were then gathered at the top, with the gathers centred in the back. The bodice was often fastened in the centre back with two drawstrings, one around the neckline and one around the waistline.
This particular ballgown was made for the Jane Austen Festival Australia – 1813 Costume Challenge. Unfortunately the cost of silk tulle was too prohibitive for my budget, so this gown was made from “Poly Tulle”, made from polyester, which is finer and drapes more like silk than the stiffer types of nylon tulle. As I could not buy tulle that was already embroidered, I decided to try embroidering the white spots on by hand. The contrasting fabric underneath was a satin-backed shantung (also made from polyester), and the lining was bemsilk acetate.
This outfit was a bit late for the Historical Sew Fortnightly Challenge #4 (Embellishing a garment), but there was no other particular challenge that it could fit under, so I have just made a late entry!

“Robe de Tulle. Garnitures de fleurs.” [Tulle Dress trimmed with flowers] Costume Parisien (1813), in Journal des Dames et des Modes.
Pattern
After much deliberation, I decided to use the picture to the right – Robe de Tulle Garnitures de fleurs – as a model for my pattern drafting. I used the pattern I drafted for my previous Regency ballgown, and just made some necessary alterations to reflect the differences that I could find in the picture. In this gown the skirts were ungored, and gathered at the back rather than pleated. The sleeves were cut fuller and the neckline was altered. The front bodice piece was cut in two pieces, rather than on the fold.
Please note: None of the measurements given here include seam allowances.
Pattern Pieces
- Bodice Front
- Bodice Back
- Front “Modesty Piece”
- Shoulder Strap
- Waistband (cut 2 – 35″ x 1/2″)
- Sleeve
- Sleeve band (cut 2 – 15″ x 1″)
- Skirt Front (cut 1 one on the fold – 15″ x 49″ – here the length of the skirt is 49 inches to floor)
- Skirt Back (cut 2 – 28″ x 49″)

Sleeve pattern piece, showing the increased height of sleeve head and width of sleeve.
Construction Steps
Step 1: After cutting out the pieces of fabric and netting, I embroidered round white spots in chain stitch evenly over all of the netting, to resemble the fashion plate picture.

White spots, embroidered in a chain stitch spiral.
Step 2: Treating the fabric and embroidered netting as one, piece the bodice together at the side seams and two shoulder seams. Leave the centre front and centre back open. Piece bodice lining together in the same way.
Step 3: Lay the bodice and the bodice lining right sides together and sew around neckline. Turn the right way and press. Gather a small section underneath each side of the bust to fit waist measurement.

The beginnings of the bodice. You can see the gathers under the bust area.
Step 4: Sew one boning casing on each side of the centre back. You can handsew eyelets into the outer fabric and lace up your dress from behind, as I did for my previous ballgown. However, this time I decided to make an inside flap to house the lacing. I made two flaps from some cotton broadcloth and inserted a piece of cable tie as boning down the centre back edge.

The cotton broadcloth eyelet flaps
Then I sewed the flaps to the inside of the bodice, allowing a gap so that I could lace the dress tighter if I need to. (I am currently six months pregnant, and am cautious of making the dress too big and not fitting into it after I have had my baby!) I handsewed the eyelets and threaded the lace through. I did need to add two hooks and eyes to the outer fabric – one at the neckline and one at the waist – to help it sit flat when worn.

The flaps sewn in the inside (a little crooked). I trimmed them a little and handsewed the eyelets.
Step 5: Once the centre back can be attached, it is a good time to try it on to figure out how to fit the centre front pieces together. For the “pointy” centre front parts, I folded under the raw edges so that I could thread a diamonte buckle onto the end.

The lower edge of the centre front bodice is turned under and handsewn closed to form a point.
Then I sewed a decorative section (or “modesty piece”) to fit into the gap at the front, embellishing it with some lace and ribbon. It can be pinned in place when you try it on to make sure it covers any necessary bits! It will be sewn in the seam with the waistband in Step 7.
Step 6: Treating the fabric and the embroidered netting as one, sew the sleeve seam and gather the sleeves at the sleeve head and the bottom edge. Attach sleeves to the bodice. (I didn’t line these sleeves, but you can if you like.) For the bottom edge of the sleeves, attach the sleeve band (right sides together), folding it inside to handsew.
Step 7: Attach the waistband and a waistband lining to the bottom edge of the completed bodice.

The front “modesty piece” is pinned in place at the top, and is pinned into the waistband seam. The waistband lining sits underneath, ready to be folded down to meet the outer waistband after stitching.
When sewing the waistband to the bodice, the centre front “pointy bits” should be left free.

You can see the “pointy bits” are pinned out of the way, but all other raw edges are contained in the waistband seam.
Once the waistband is sewn, the centre front “pointy bits” can be threaded with the diamonte buckles and sewn together.

The centre front seam is only small, and the seam allowance can be handsewn flat if desired.
Then I handsewed the “modesty piece” to the top edge of the bodice, just to hold it in place properly. In the pictures above, you can see where the bodice and “modesty piece” have been pinned in place to be handsewn later.
Step 8: Piece the skirts together, with a centre back seam and two side seams. Do the same with the netting. Gather the back of the skirts to fit the bodice, gathering the fabric and the netting separately and then laying them on top of each other.
Step 9: Attach the skirts to the waistband. The side seams should reach all the way around the body to the side back. On the inside of the dress, turn all raw edges into the waistband area, fold the raw edges of the waistband lining under and handsew.

The inside of the dress, showing the waistband lining pinned ready to handsew.
Step 10: Hem the dress. Attach any trims around the hem of the netting. I had also wanted to attach some fabric flowers to the bottom, as in the fashion plate picture, but ran out of time! Maybe later…

Two rows of pleated netting, with ribbon bordering the top and bottom.
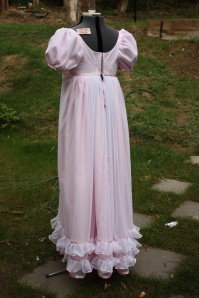
Back view, without the embroidered spots. The centre back gapes a little and needs a couple of hooks and eyes to help it sit flat.

Front view
I am really, really happy with how this dress turned out! I was very anxious about my ability to make a dress when all that I had to work with was an old fashion plate picture. It did take a lot of preparation, as I spent a lot of time thinking about my design and how to accomplish it, and I also did a toile of the bodice to make sure my design ideas were going to work.
In the end I feel I did the fashion plate justice, though I did not embellish the sleeves in quite the same way.
Historical Sew Fortnightly details: This gown is fairly historically accurate. Whilst the garment is copied from a 1813 fashion plate, most other parts of construction (the pattern, bodice construction, lacing, etc…) I have seen on other extant garments of the period. The fabric I used, however, is not historically accurate. This took me many, many hours to complete! I would estimate it at about 50 hours, as I worked on it for over two months from toile to completion (and the embroidery and flower trims are yet to be completed). It will be first worn at this years Jane Austen Festival in Australia. Total cost came to AUD $126, largely due to the fact that I had nothing to use for it in my stash and had to buy everything new.
For more of my posts on making Regency wear, go to My Regency Journey.
Related Posts
My Regency Journey: Making a Ball Gown
Jane Austen Festival, Australia – 2013 – for a picture of me in this gown
Sources and Relevant Links
A French brown silk and net dress c. 1805-1810 – The Metropolitan Museum of Art
A white net overdress c. 1805-1810 – The Metropolitan Museum of Art
Pink and cream silk net dress c. 1800-1810
Cream and green silk net dress c. 1810 – The Metropolitan Museum of Art
Red silk net overdress c. 1807-1811 – Victoria and Albert Museum
Regency Fashion: The Muslin and Net Period – at Jane Austen’s World
It’s All in the Details: Making a Regency Ball Gown
Handsewn eyelets – by Sempstress
Jane Austen Festival Australia – 1813 Costume Competition
Historical Sew-Fortnightly – from The Dreamstress
Read Full Post »


